

 https://www.youtube.com/watch?v=YfWoYF2Kfg8
How To Make A Basket From Pine Needles
Hi everyone today, I’m sharing with you how I made this beautiful pine needle basket. Lately I’ve, been obsessed with pine needle basketry, and I thought I would share my process with you. The first thing you will need is, of course, pine needles. I’ve, been using ponderosa pine needles, But you can make baskets from many different pine needles as long as they are about 5 inch or 12 centimetres long or longer the longer they are. The easier it is to work with them. You can gather the brown needles whenever you like, really, although the longer they have been on the floor, the more likely they will have. Some imperfections Only pick up the best clusters from the top layer on the ground and avoid picking any they have been buried by others Avoid pine needles that have spotting or signs of mildew, as this will show up on your basket, Arrange the clusters so that they Are all faced in the same direction and please make sure you only take what you need So that the pine needles can continue serving the forest as mulch After stormy or windy weather, you might be lucky to find full fallen branches with the needle still attached.How To Soften The Pine Needles
This is a much quicker way to collect the needles, although they might still need to be left out in the Sun to dry. Only work with fully dried needles, as green needles will shrink, leaving you with a soggy basket, which would be a shame. The next step is to soften the pine needles, and for this you will need some water Boil enough water to cover the needles and then pour it on top of them and leave the needles to soak for about 30 minutes. If you are not using your needles straight away, place them in the freezer for a few days to get rid of any insects, And then you can store them in a box in a dark place. This way they will keep for several months.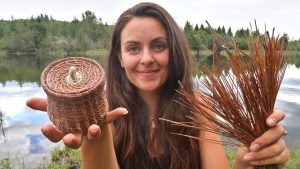 Once the pine needles have been soaked and drained. You should have a very elastic pine needle that does not break while bending To keep their elasticity. You will need to wrap them in a damp towel, while you work with them To complete this project.
If we also need some kind of resistant thread, I have been using some waxed polyester thread that I use from making macrame jewelry and nylon upholstery thread. Other people like to use artificial sinew walks, linen or even raffia, but really any kind of strong thread will do For this project.
I decided to use wax polyester thread. You will also need a pair of scissors, a pair of pliers Needles and a gauge to allow you to make the same size coil and help you to hold the needles. I personally use a piece of paper straw, but you could also use a small piece of metal tubing for it Start by cutting a piece of your chosen thread. I like to measure my pieces by just pulling twice the length of my arm.
That gives me about two meters of thread: The cap, the peñitas that you will work with by pulling the ends with your nails, You can also cut the ends away if you prefer, but by doing that, you will have separate needles instead of clusters, Which can be A little bit harder to work with Take your gage and place enough needles inside always in one direction.
The needles should fit snugly, but you should still be able to move the gage up and down Move the gauge about eight centimetres from the end of your pine needles and make a knot with your thread near the gage Start.
Wrapping the thread towards the pine needle caps, Once you have wrapped about 6 centimeters, hold the wrap in place and bend it in half. Now you can thread the needle and start stitching by passing the needle from one side of the bent coil to the other.
You can use your pliers here if it’s difficult for you to pull the needle through the coil Continue doing this on the length of the coil. Until you have the two sides securely linked And now you can cut the excess by needles.
Make sure this is from the cluster side and not from the side of the pointy needles, Continue working on the coil by wrapping the thread About ten times and then taking the needle and inserting it into the coil.
You just worked on Whenever your gauge starts wiggling around you will have to fit by needles to it, so that if it’s, snugly again to do this Always add them in the center to avoid them. Sticking out later on, The bigger the coil gets, the more often you will need to add needles to it.
Continue this way by wrapping and bending the coil and stitching until you have another ten centimeters of wrapped coil, When you run out of thread, remove the needle from it and re-string it on the new piece of thread Then insert the needle on the opposite side of Where the thread tail is and pull it through, Leaving about ten centimeters of tail on the new thread tie the two threads by making two double knots.
As I’m using waxed thread, I like to cut the tails off and then burn the ends with a lighter the wax melted by the heat. It secures the ends of the coil. But if you’re using something else than wax thread, you can leave the tails on and Hide them between the coils.
Now we will plain stitch the first round of the coil by just inserting the needle on the back of the work Through the wrapped coil.. We just worked on Secure the stitch tightly and repeat all around the first coil by leaving about three millimeters between the stitches.
Once you reach the starting point of the stitches, You can either continue with a single stitch by inserting your needle to the right of the stitch below or you can try the split Stitch like I do here.
To do this. You just need to insert your needle about halfway through the stitch on the coil below I like to flip the work to make sure that I insert it on the thread on both sides.. I I personally find that the split stitch makes the work.
Look a lot neater, But I must admit it takes a lot more time than a single stitch. The bigger the coil gets, the wider. The stitches will be so when they’re about One and a half centimeters apart., You will need to add stitches to keep the basket strong To do this.
Just add a plain stitch between the two split stitch Continue adding stitches until you go back to the first double stitch that you added And then continue as usual by working with a split stitch. If you’re, making a small basket, you probably won’t even need to add stitches, but you definitely will. If you’re, making a bigger basket Continue working on the coils until you reach the desired dimension for your bottom coil mine was nine centimeters wide Before starting the walls.
I burned all the tails from the added thread. You could do this at the end, But it might be a little bit hard to reach the bottom once the basket is finished To shape the walls. You just need to place the new coil on top of the last bottom coil.
Once the pine needles have been soaked and drained. You should have a very elastic pine needle that does not break while bending To keep their elasticity. You will need to wrap them in a damp towel, while you work with them To complete this project.
If we also need some kind of resistant thread, I have been using some waxed polyester thread that I use from making macrame jewelry and nylon upholstery thread. Other people like to use artificial sinew walks, linen or even raffia, but really any kind of strong thread will do For this project.
I decided to use wax polyester thread. You will also need a pair of scissors, a pair of pliers Needles and a gauge to allow you to make the same size coil and help you to hold the needles. I personally use a piece of paper straw, but you could also use a small piece of metal tubing for it Start by cutting a piece of your chosen thread. I like to measure my pieces by just pulling twice the length of my arm.
That gives me about two meters of thread: The cap, the peñitas that you will work with by pulling the ends with your nails, You can also cut the ends away if you prefer, but by doing that, you will have separate needles instead of clusters, Which can be A little bit harder to work with Take your gage and place enough needles inside always in one direction.
The needles should fit snugly, but you should still be able to move the gage up and down Move the gauge about eight centimetres from the end of your pine needles and make a knot with your thread near the gage Start.
Wrapping the thread towards the pine needle caps, Once you have wrapped about 6 centimeters, hold the wrap in place and bend it in half. Now you can thread the needle and start stitching by passing the needle from one side of the bent coil to the other.
You can use your pliers here if it’s difficult for you to pull the needle through the coil Continue doing this on the length of the coil. Until you have the two sides securely linked And now you can cut the excess by needles.
Make sure this is from the cluster side and not from the side of the pointy needles, Continue working on the coil by wrapping the thread About ten times and then taking the needle and inserting it into the coil.
You just worked on Whenever your gauge starts wiggling around you will have to fit by needles to it, so that if it’s, snugly again to do this Always add them in the center to avoid them. Sticking out later on, The bigger the coil gets, the more often you will need to add needles to it.
Continue this way by wrapping and bending the coil and stitching until you have another ten centimeters of wrapped coil, When you run out of thread, remove the needle from it and re-string it on the new piece of thread Then insert the needle on the opposite side of Where the thread tail is and pull it through, Leaving about ten centimeters of tail on the new thread tie the two threads by making two double knots.
As I’m using waxed thread, I like to cut the tails off and then burn the ends with a lighter the wax melted by the heat. It secures the ends of the coil. But if you’re using something else than wax thread, you can leave the tails on and Hide them between the coils.
Now we will plain stitch the first round of the coil by just inserting the needle on the back of the work Through the wrapped coil.. We just worked on Secure the stitch tightly and repeat all around the first coil by leaving about three millimeters between the stitches.
Once you reach the starting point of the stitches, You can either continue with a single stitch by inserting your needle to the right of the stitch below or you can try the split Stitch like I do here.
To do this. You just need to insert your needle about halfway through the stitch on the coil below I like to flip the work to make sure that I insert it on the thread on both sides.. I I personally find that the split stitch makes the work.
Look a lot neater, But I must admit it takes a lot more time than a single stitch. The bigger the coil gets, the wider. The stitches will be so when they’re about One and a half centimeters apart., You will need to add stitches to keep the basket strong To do this.
Just add a plain stitch between the two split stitch Continue adding stitches until you go back to the first double stitch that you added And then continue as usual by working with a split stitch. If you’re, making a small basket, you probably won’t even need to add stitches, but you definitely will. If you’re, making a bigger basket Continue working on the coils until you reach the desired dimension for your bottom coil mine was nine centimeters wide Before starting the walls.
I burned all the tails from the added thread. You could do this at the end, But it might be a little bit hard to reach the bottom once the basket is finished To shape the walls. You just need to place the new coil on top of the last bottom coil.
Stitching The Pine Needles Together
This way creates a vertical coil Stitch, your first stitch as usual, and then stitch it again by going through the same hole one more time. This will create a V stitch, which I find very nice on basket. Walls, If you need to take a break from your basket weaving, you can wrap your basket and new needles in a damp towel Then place them in a plastic bag, close the plastic bag and leave it in the fridge. You can keep the needles workable for about 7 to 10 days. This way You just need to make sure that the towel is damp. Every few days, Once you’re ready, continue working on your walls with the v stitch. If you place your coils directly on top of each other vertically, You will get straight walls.. If you place them slightly on the outside or inside., You can create widening or narrowing baskets For this basket.Creating A Lid For Your Little Basket
I wanted to have a flat lid, and for this you need to create a little shelf where the lid can rest. To do this at the top of the walls I placed one coil to the outer edge of the code below by making it horizontal. I stitched it and then I added a vertical coil to this. I know this sounds very complicated, but you’ll, probably get gist just by looking at the images When you reach the required height of your basket. For me was about eight centimeters. You can remove the gage and let your needles free From this. You can keep stitching around the basket as usual until you will have enclosed all of your needles. If the coil is too thick, you can remove or cut some of the needles. The Goal here is to have a top as flat as possible, And now you can secure your thread by passing it a few times under the last stitch and then cut it. The last thing I like to do is to cut off any pine needles that are sticking out. I do this with a scissor, but you could also rub a cloth gently on your basket to remove them, and Here comes the tricky part To create the flat lid.. I basically repeated the steps for the bottom of the basket, But the only difference that at the beginning, I also created a little handle to do this wrap about 6 centimeters at the start of the coil and Then bend the coil and stitch only at the base Of the coil and not through the length, Keep wrapping the thread around the coil and bend it to create a 90-degree angle from the handle. This might takes a few times to get the hang of it. It is a little bit tricky, but I’m sure that if you keep practicing you’ll, get there Keep working on the coil by wrapping the thread stitching it to the previous coil and work around the handle, as if it was The center of the bottom coil, and once again, when you have the desired Dimensions of your wrapped coil, you can continue with one round of simple stitch and then continue with rounds of split stitches. And here it comes. The fun part. Try the lid on to the basket and see if it fits You don’t want the lid to fit too snugly. Yet on the basket., You want to leave a gap of about 1/2 of a centimeter from the lid to the basket. Once you’re there, remove your gauge and finish off your lid, like you did for the body of the basket And then finish the lid by back stitching the rim of the lid. To do this, You just need to go back in each stitch. Backwards. This creates a nice edge and add strength to the lid. If you find this very difficult, there are many other ways to add handles. You can have a pinecone handle, you can add, braided handles at the end or even just glue one when the lid is finished And here’s, how the finished basket looks Here’s. Another basket I made with a normal lid, where I didn’t, add the step on the body of the basket, But instead I made a flat lid and then added a few vertical coils to the outer edge to create a fitting lid. You can see this basket is a little bit lighter in color That’s, because the needles have dried, since I soaked them and they returned to the natural color. Eventually, the new one will also become light.
Bart Humes, our editor, is a seasoned camping and survival enthusiast from Colorado. With expert knowledge in orienteering, fire-starting, and wilderness first aid, Bart’s passion and skills make him a master of the great outdoors.