


How To Build A Double Barrel Wood Stove Made From Two 55 Gallon Drums with Heat Exchanger Unit
Welcome back friends in the shop today we’re gonna be adding the second barrel turning our single barrel into a double barrel: wood stove, but we’re, not gonna stop. There we’re gonna add some very clever heat exchangers like you would find on an old steam locomotive.
The second barrel finally showed up funny. I ordered both of these off of Amazon. One showed up ups a couple weeks ago. The other showed up USPS with a very unhappy mailman. Wait a minute. Did he just say mailman? Is it you supposed to see mail person now with half our audience gone off, renting their garments and tearing hair and sitting in sackcloth and ashes? We can get to work on the wood stove, so this this here is 2 inch exhaust tubing.
I went down to the local mechanic shop and he had some in stock. He sold me it’s 18 gauge, so it’s. Very similar to, though, to the barrels we’re gonna use these. We’re gonna put six of these through the barrel, and it’s. Gonna greatly increase the surface area so that we can blow a fan across it and get twice the heat, maybe more, with the same amount of wood. I imagine this being a clock. 12. 6. 3 & amp 9. Now we have 6 tubes to put in.
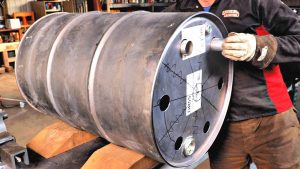 We can get three out of each dick right, so we’re gonna put tubes at these degrees. I figured out the angles. So if we start here with 90, we’re gonna go 90, 33:32, 72, 10 and 150, and that will equally-spaced those around there.
The guy told me this tubing was 2-inch OD, so that we need a two inch. We want it tight because we’ve got to weld them all in so that’s a 2. This is a 2 inch here that won’t be big enough, so it’s, not not to mention.
I DS a little bit more than that. I’ve got a 2 and 1/16 and that’ll, probably be about right. If we look at them, be careful when you’re using a hole saw these cordless drills are so powerful.
Nowadays, there’s, a real technique to cutting it to steel. With these, what you do is you once you start your hole? Don’t, go too fast. You want to start cutting on that leading edge. You want to bend that over.
If you try to cut on the whole bit at one time, it’ll chatter and tear up the teeth and give you all sorts of trouble. So, as you start to cut it at an angle and you feel it catching just start increasing that pressure rolling it around like rolling it rolling a neck around and usually from here to here, you’ll, get through it.
If you do it properly, I got ta say I’m, pretty happy the math worked out there. We’ve got to figure out. How long do you make these now? It would be really cool if we could cut these this tubing. The exact same thing in and do a beautiful but kind of a butt end weld around there.
There’s, guys that can do that and make it look nice I’m, not that guy, so I ‘ Ve got to have something more to weld on to so I’m gonna stick these out here a little bit and then that will give me a corner weld which is easier for me.
I changed my money guy, so I only went one inch over. So I with a one inch over cut that’s, going to give us a half inch sticking out each side. We’d, be able to put a nice bead around there. So now we’ve increased the surface area.
We can do something as simple as putting like a Walmart box fan behind this and blowing hot air through here. It makes a tremendous difference that’s when we go from conductive heat, meaning just the heat that you can feel coming off to convected heat heat that were blowing through the with the fan through the air, and that could heat a small area way Way faster same would same hoods same energy displacement, but you’re, getting a much more efficient use of the heat you’re, getting a lot more heat out of the smoke before it goes out.
Adding A Chimney To The Wood Stove
The chimney. I’m – certainly not God’s gift to welding. So I’m gonna do a little practice run here. To get my settings right by the welder and such so, we’ll drill this out, but if you could pipe in because if discretion is the better part of valor, then sharing your welds on YouTube is the better part of courage.
They’re, anything prettier than Miller blue and that’s. A gorgeous color. Okay, we’ve got a gauge on here. That gives us our baseline settings to work with so where we figured, we were 18 gauge, so solid wire steel. So we’re looking at five and fifty five and fifty, I think what that’s telling us is that we want our voltage on five and our wire speed at 50. Now this will der welder in its infinite wisdom. He’s, a smart welder.
Apparently it can estimate the wire speed. I think there’s, a better chance of this welder, no incorrect wire speed for this setting than for me. So we’ll, go just go with the automatic automatic setting battery guide to my welding helmet.
Keep a couple extra batteries in there boy that’ll die at the most inopportune time. These new help. Viking. I guess this is a Viking here. These helmets are really snazzy, not like the ones back in the day they have a basically a shade computer, and now I’m – probably not supposed to be cleaning it with this.
I hear all about it. A shade computer that you can really dial in, like your shade, your sensitivity, your delay time and then that should snap into the to the hood dirty hair whoops. So I guess that’s, a replaceable piece that’s, a good idea.
You know, I think that that might be dirtier than when I began. I think I got this. I get this thing in upside-down. I think I had that on backwards, yeah it’s, definitely dirtier than when I started at this point.

Bart Humes, our editor, is a seasoned camping and survival enthusiast from Colorado. With expert knowledge in orienteering, fire-starting, and wilderness first aid, Bart’s passion and skills make him a master of the great outdoors.